
Saree mode
Create an AI saree photoshoot: upload the saree body, pallu and blouse separately, use saree poses and Indian backgrounds, and add jewellery and a hairstyle.
Use Saree Mode for every AI saree photoshoot. You upload the saree body, the blouse and the pallu as separate photos, so the pallu falling over the model's shoulder is the pallu you photographed, and the blouse comes out in the fabric you actually ship. Saree Mode also adds saree poses and a Saree Styling option for jewellery and hairstyle.
To turn it on, choose the saree mode in Settings. See Switch modes.
Why a saree needs separate photos
A saree isn't one surface. It's five and a half to nine yards of fabric with three parts that look different, and buyers check each one.
| Upload slot | What it is | Required? |
|---|---|---|
| Saree Body | The main run of fabric. It sets the ground color, the weave and the print. | Required |
| Blouse | The blouse piece, usually attached to the saree as an unstitched length. Often a contrast color, and a separate garment in the final drape. | Optional, but recommended |
| Pallu | The decorative end that falls over the shoulder. Usually the most ornate part, and the first thing a buyer looks at. | Optional, but recommended |
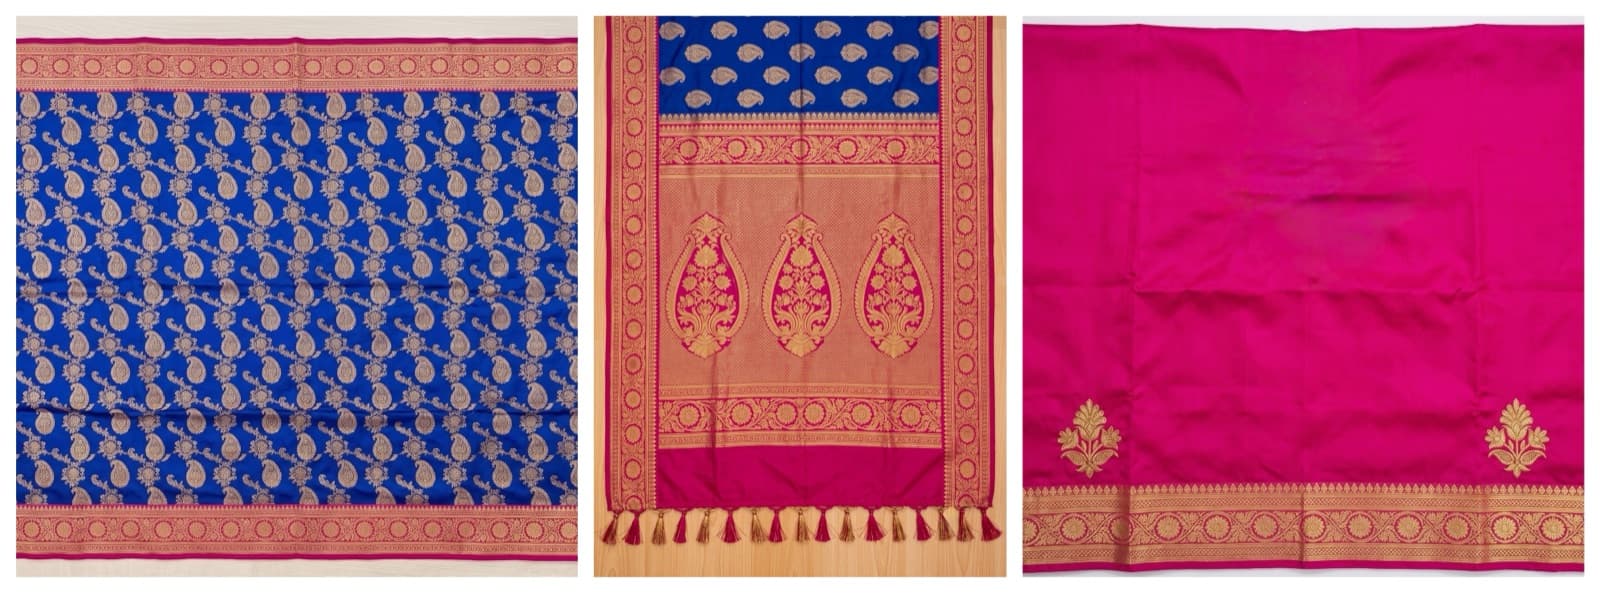
Three photos of one saree, from left: the body, the pallu and the blouse. Neither the pink and gold pallu nor the contrast pink blouse would show in a photo of the body alone.
A folded saree photo usually shows the body and some of the border. The pallu is partly hidden, and the blouse piece looks like more body fabric. With only that photo, the pallu and blouse in your results are a guess: you can end up with an invented pallu or a blouse in the wrong color. Separate photos make every part come from your real saree.
How to photograph a saree
- Saree Body: lay it flat with at least one full run of the border visible.
- Blouse: photograph the blouse piece on its own, with its border and any motifs in view.
- Pallu: open it out so the whole design shows.
The hint on the Product step also suggests close-ups for better accuracy. There are slots for the blouse and pallu but not for the border, so make sure the border shows clearly in the Saree Body photo.
A few habits help every part come out faithfully:
- Light it well. Detail carries over from your photo. For zari and other metallic work, use light that falls across the fabric from the side. Flat light from the front can make metallic thread look like grey cotton.
- Steam out fold lines. Sharp folds can show up as creases in your results.
- Fill the frame. Keep each part sharp and in focus.
For more photo tips, see Prepare garment photos.
Create a saree photoshoot
Turn on Saree Mode
In Settings, choose the saree mode. See Switch modes.
Start a new photoshoot
Click New Photo Shoot in the sidebar. The Create Photo Shoot page opens on the Product step. As you go, the Live Preview on the right shows your choices.
Upload the saree
Add the Saree Body photo, then the Blouse and Pallu photos if you have them. Click Upload Saree & Continue. The button stays disabled until you add the saree body.
To reuse a saree you've uploaded before, pick it under Or use existing product and click Continue. Sarees uploaded with more than one part show the number of images on their tile.
Choose a model
On the Model step, click a saved model, add one from Use our models, or click Create New Model. Clicking a saved model selects it and takes you to the Pose step. See Choose a model.
Choose a pose
Pick one pose. Saree Mode adds saree poses to the Ethnic category (see Saree poses). You can also upload your own pose or describe one in words. See Choose poses.
Choose a background
On the Background step, pick a preset, upload your own background or describe one. See Backgrounds for sarees.
Set the output
On the Output step, choose the Aspect Ratio and Resolution. Under Saree Styling (optional), choose jewellery and hairstyle (see Jewellery and hairstyle). Add anything else in Additional Instructions (optional). See Output settings.
Generate
Check the credit estimate in the footer (for example, Est. 2 credits for an HD - 2K photo) and click Generate Photo Shoot. It usually takes 30 to 50 seconds. When it's ready, the photo opens on the Photo Shoot Result page. See Edit and improve results.
Each shoot makes one photo in one pose. Standard - 1K costs 1 credit, HD - 2K costs 2 credits and Ultra - 4K costs 3 credits.
Selling on Myntra?
Pick Myntra under Marketplace, below the Live Preview. In Saree Mode it marks poses such as Saree Drape Front, Back Drape and Detail Close Up, and backgrounds such as White Seamless, as Recommended. See Marketplace presets.
Saree poses
Saree Mode adds five poses to the Ethnic category:
- Walking Away
- Walking Side
- Seated Casual
- Hand to Forehead
- Pallu Over Hand
The Ethnic category also has Saree Drape Front, Hands Clasped, Back Drape, Detail Close Up, Glam Touch, Lehenga Twirl, Dupatta Flow and Namaste Greeting. The other categories (Standard, Movement, Casual, Seated, Editorial and Dynamic) are there too.
To show off the pallu, try Pallu Over Hand. For the back of the saree, try Back Drape. Saree Mode has no back-photo slot, so check back views carefully against your saree.
Backgrounds for sarees
For Indian users, the Background step starts with two Indian categories, and Haveli Courtyard is selected by default:
| Category | Backgrounds |
|---|---|
| Ethnic Indoor | Haveli Courtyard, Palace Interior, Floral Mandap, Temple Corridor, Sheer Curtain Studio |
| Heritage | Rajasthani Fort, Jaipur Street, Varanasi Ghat, Kerala Backwater |
A heavy Banarasi silk can go in Haveli Courtyard, and a cotton saree on a plain backdrop. For marketplace listings, a plain studio background such as White Seamless from the Studio category is the safe choice. See Backgrounds.
Jewellery and hairstyle
On the Output step, Saree Styling (optional) has three tiles. You can turn on any of them, or none.
| Tile | What it does |
|---|---|
| Jewellery | Adds jewellery matched to the saree style |
| Jewellery from Model | Keeps the jewellery the model already wears in her photo. If she has none, none is added. |
| Hairstyle | Matches the hairstyle to the saree style |
Jewellery and Jewellery from Model can't both be on. Pick Jewellery from Model when your model's own jewellery is part of your brand look.
Advanced Saree Engine
When the saree mode is selected in Settings, a Saree engine choice appears under it:
| Option | What it's for |
|---|---|
| Advanced (Beta) | Built for complex designs, with sharper handling of the pallu and border |
| Normal | The original saree engine. Pick it if a design comes out better the classic way. |
You can switch any time. The change applies to your next photoshoot.
Try Advanced (Beta) when:
- The border carries heavy work, such as zari or woven motifs, and buyers will judge the saree by it.
- The pallu has a detailed design that has to match the real saree.
- In your results, the border changes or breaks partway along.
Advanced (Beta) is still in beta
It can occasionally make mistakes. Check every photo against your saree, and if a design comes out better with Normal, switch back and generate again.
Shoot many sarees at once
To shoot a whole collection, use Bulk Photoshoot. In Saree Mode, each product row has a Saree body slot (required) and optional Pallu and Blouse slots. You can get up to 10 photos per product, each in its own pose.
To reuse your usual model, pose, background, output and saree styling, save them as a Shoot Template.
Product shots from the same photos
The same saree photos can also give you supporting images for your listing, with no model:
- Border Detail: a close-up of the border embroidery.
- Pallu Flat Lay: the pallu spread flat, with its full design visible.
- Blouse Flat Lay and Blouse Front & Back: the blouse on its own on white, or its front and back on an invisible mannequin.
- Color Variant: the same photo in a new colorway, from photos of the new fabric.
See Saree detail shots, Blouse product shots and Color variant.
Export for marketplaces
Download your photos at original quality, or use the Myntra option under MARKETPLACE EXPORT to get a 1080×1440 listing image under 1 MB, with no resizing on your side. See Download and export.
Turn a saree photo into a video
Show the drape and the border in motion. The Fabric in motion, Detail reveal and Wind machine motion templates suit sarees well. See Motion templates.
Check before you publish
Compare every photo with the real saree
Results can vary in color, weave, drape and small details. Check the border, the embroidery and the pallu against your saree, and fix or regenerate anything that doesn't match before you list it. See Edit and improve results.
Frequently asked questions
Turn on Saree Mode in Settings, click New Photo Shoot, add the Saree Body photo (plus Blouse and Pallu if you have them) and click Upload Saree & Continue. Then pick a model, pose and background, set the output, and click Generate Photo Shoot. An HD - 2K photo costs 2 credits and usually takes 30 to 50 seconds. See Create a saree photoshoot.
No, only Saree Body is required. But without blouse and pallu photos, those parts are a guess and may not match your saree. Add them whenever you can.
Photograph the saree flat with at least one full run of the border visible in the Saree Body photo. Try the Advanced (Beta) saree engine for heavy borders. For an image of the border on its own, use the Border Detail product shot.
Each shoot makes one photo in one pose. To get several poses at once, use Bulk Photoshoot, which makes up to 10 photos per product, each in its own pose.
For most listings, no. For premium handwoven sarees, where buyers zoom in to judge the zari, real close-up photos of the cloth are still worth adding next to the on-model photos.
Related
Garment modes
Garment modes tune AI photoshoots for sarees, dupattas, salwar kameez and shirts, with the right upload slots, poses and styling options for each garment.
Dupatta mode
Shoot dupattas on an AI model with seven dupatta-only poses, from full-body drape to twirling flow, using a simple front photo and an optional back photo.