
Edit and improve results
Edit AI fashion photos after a shoot: fix details in words, upscale to 4K, switch between versions, make new variations and poses, or add your logo.
When a photo is almost right, you don't have to start the shoot again. Edit your AI fashion photo on the Photo Shoot Result page, the editor where every finished photoshoot opens: fix a detail in words, upscale it to 4K, go back to an earlier version, or make more photos from it. This page covers the editor in the web app.
To see what your plan includes, check Compare plans.
Open the Photo Shoot Result editor
- When a photoshoot is ready, its photo opens in the editor.
- To open an older shoot, click Projects in the sidebar, open the project and click Edit in Studio. See Projects and history.
On a wide screen, the editor has three columns. In a narrow window, they're stacked in one column.
- Left: the shoot's PRODUCT, MODEL, POSE and BACKGROUND, the PRODUCT SHOTS you can make from it, and New Shoot.
- Middle: the photo. Badges on it show the version's name and resolution, such as "3 - casual walk" and "2K". Above it are the view switch, Brand Kit, Report issue, and the zoom and full-screen buttons. Below it are Download, Upscale, Create Video and a share button.
- Right: Fix & Refine, Generate More and Version History.
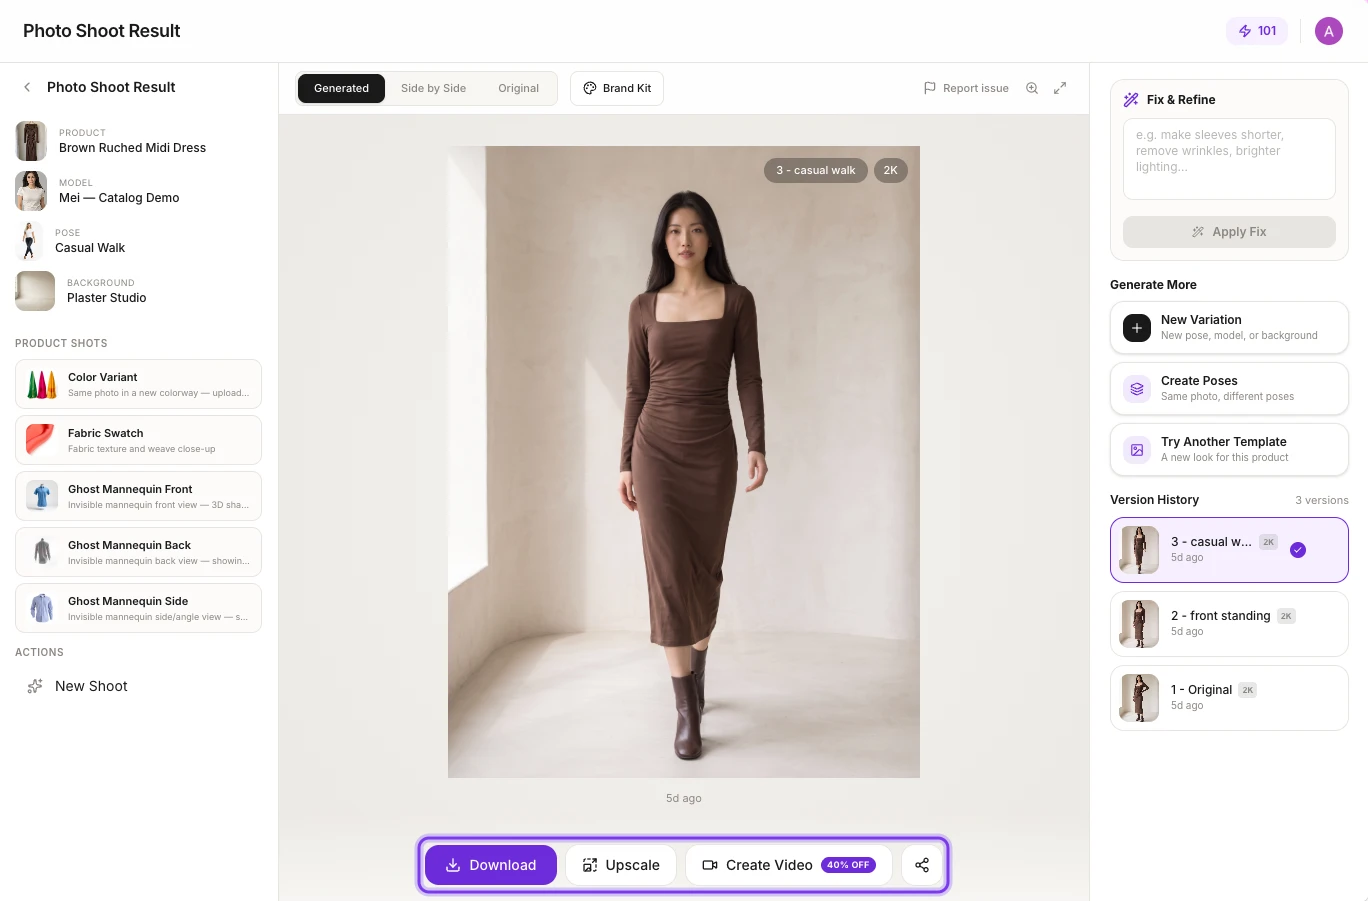
Which tool to use
| You want to | Use | What changes | Credits |
|---|---|---|---|
| Fix one detail and keep the rest of the photo | Fix & Refine | Only what you describe | Not shown before you apply |
| Get the same photo in a higher resolution | Upscale | The size, to 4K | 3 |
| Re-shoot the photo with another model, pose, background or shape | New Variation | Only what you pick | 1, 2 or 3 per photo, by resolution |
| Get the same photo in more poses | Create Poses | Only the pose | 1, 2 or 3 per pose, by resolution |
| Put your logo or text on the photo | Brand Kit | Adds your logo or text | No credit cost shown |
| Compare the result with your garment | Side by Side | Nothing. It's a view for checking | None |
Fix details with Fix & Refine
Use Fix & Refine when a photo is almost right. Describe what to change in a few words, such as "make sleeves shorter", "remove wrinkles" or "brighter lighting", and the fix changes only that. Image refinement is included in every plan, including Free.
Open the photo
Open the photo in the Photo Shoot Result editor.
Describe the fix
In the Fix & Refine box, write what to change, for example "Remove the wrinkles on the skirt".
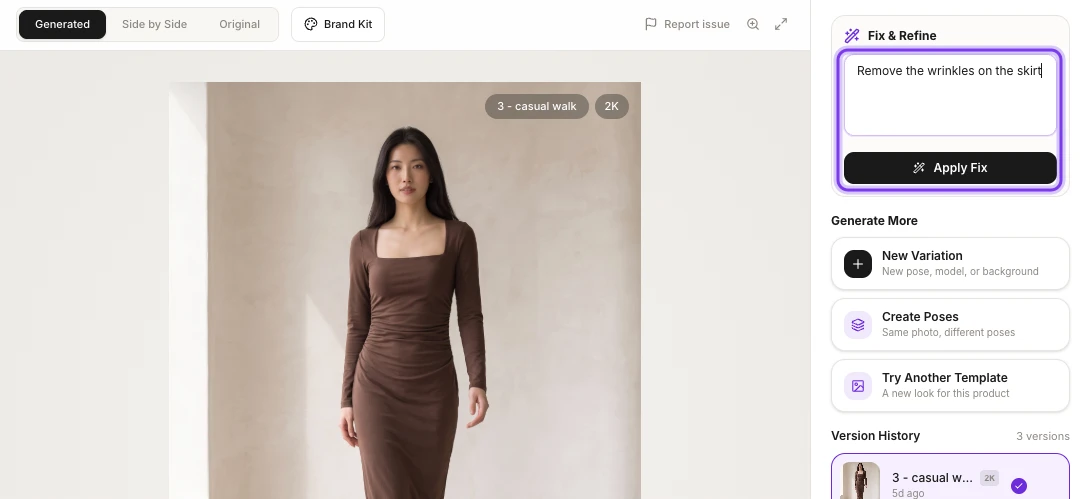
Apply it
Click Apply Fix. The button is available once you've typed something. No credit cost is shown before you apply a fix.
Check the result
The fixed photo is added to Version History as a new version, and your earlier versions are kept. Look at it closely before you use it.
Be specific
Say what to change and where, for example "remove the wrinkles on the skirt" rather than "fix the skirt". If the result still isn't right, describe the fix in other words and try again.
Go back to an earlier version
Version History lists every version of the photo, newest first, for example "3 - casual walk", "2 - front standing" and "1 - Original". Each one shows its resolution, such as 2K, and how long ago it was made, such as "4d ago". The version you're looking at has a check mark.
Click a version to show it. Download under the photo saves the version on screen. For marketplace sizes, or to download several versions at once, see Download and export.
Every version also stays in the project, under GENERATIONS on the project's page, so you can download it again later. See Projects and history.
Compare the result with your garment
Use the switch above the photo:
- Generated shows the result.
- Side by Side shows your product photo next to the result.
- Original shows your product photo.
Use it to check logos, embroidery, borders and stitching against your garment.
Check every photo before you publish
AI results can vary in color, weave, fit, drape and small details, and you're responsible for making sure your photos show your products accurately. Compare each photo with the real garment, and refine or regenerate anything that's off before you list it.
Upscale to 4K
To get the same photo in a higher resolution, click Upscale under the photo. The menu says "Same photo in higher resolution." Click Upscale to 4K. It costs 3 credits.
Make more photos from this one
Under Generate More, you can make new photos of the same product without uploading anything again.
Make a new variation
New Variation ("New pose, model, or background") re-shoots the photo with the model, pose, background or output settings you pick, and keeps the rest. It costs 1, 2 or 3 credits per photo, by resolution. See Make a new variation.
Create new poses
Create Poses ("Same photo, different poses") makes the same photo in up to 10 new poses. Only the pose changes, and you pay for each pose by resolution. See Create poses from a photo.
Try another template
Try Another Template ("A new look for this product") is for giving the same product a different look from a template. See Photoshoot templates.
Add your logo and text
Click Brand Kit above the photo to place your logo and text on it, then save them into the photo. No credit cost is shown. See Add your logo and text with Brand Kit.
Make product shots of the same garment
Under PRODUCT SHOTS on the left, start garment-only shots of the same product, such as Color Variant (the same photo in a new colorway), Fabric Swatch or Ghost Mannequin Front. The list depends on the type of garment. See Product shots.
Turn the photo into a video
Click Create Video under the photo to bring it to life with a motion template, or to make a UGC Styling Tip video. See Videos from a photoshoot.
Report a problem with a result
To report a problem with a photo, click Report issue in the toolbar above it.
More you can do with a finished photo
- Swap the backdrop on any photo with the Background Changer.
- Turn it into a four-look lookbook with the AI Lookbook Generator.
Related
Reuse settings with shoot templates
Save your model, pose, background and output choices as a shoot template, then apply it in one click to keep every product photo in your catalog consistent.
Make a new variation
Make a new variation of an AI fashion photo: change the model, pose, background or aspect ratio, keep the rest, and see the credit cost before you start.