
Bulk photoshoot
Shoot your whole catalog with AI: add up to 50 products, apply one model, pose and background set to all, approve the first photo, then generate the rest.
Bulk Photoshoot runs an AI photoshoot for a whole collection in one batch: up to 50 products, with up to 10 photos each. You set one model, your poses and a background once, and customise any product that needs something different. You can also approve each product's first photo before the rest are made, so a problem costs you one photo instead of a full set.
Bulk Photoshoot is in the web app: click Bulk Photoshoot in the sidebar.
Open Bulk PhotoshootTo see whether your plan includes Bulk Photoshoot, check Compare plans.
Create a bulk photoshoot
The Bulk photoshoots page lists your earlier batches under Recent batches, with their status and the credits they used. To start a new one, click Create bulk photoshoot. There are three steps: Products, Photoshoot and Review & start. You can click an earlier step to go back to it.
Add your products
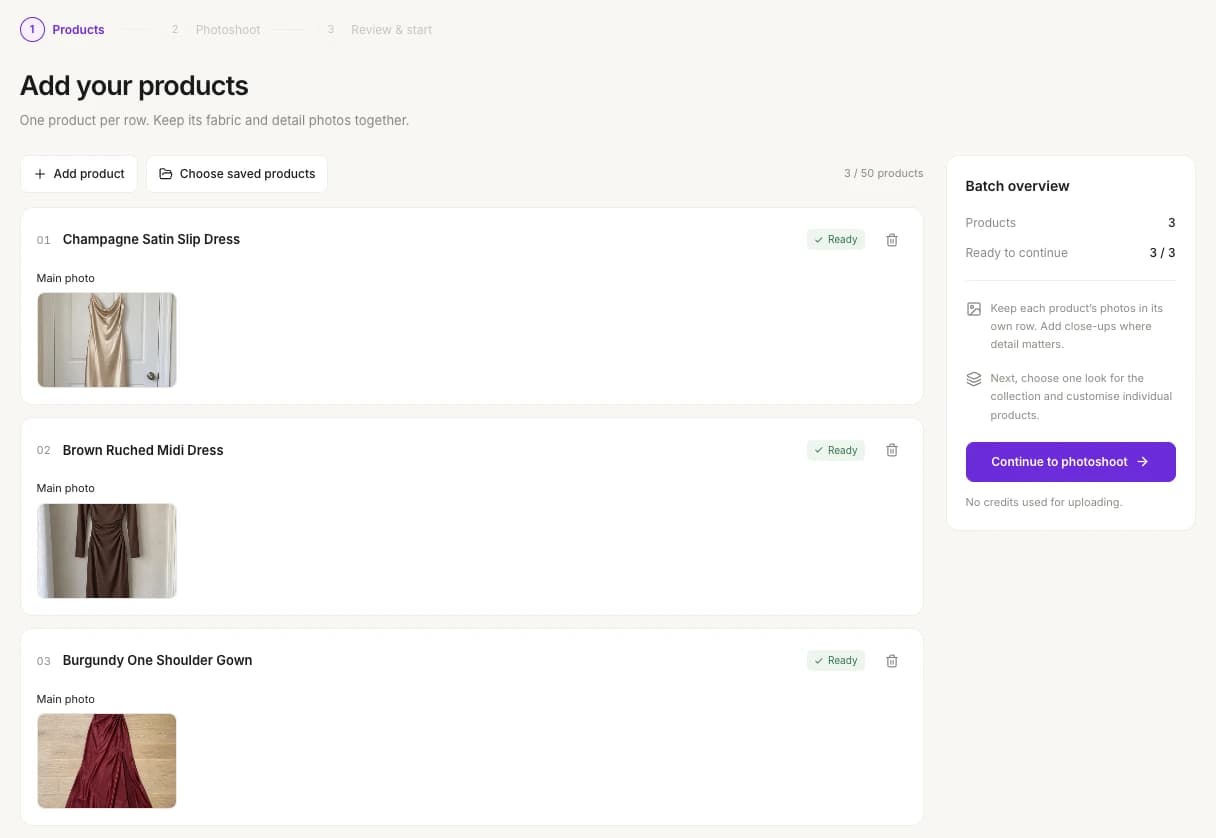
In Products, click Add product to add a row, name the product and upload its photos. To use garments you've already uploaded, click Choose saved products. Keep each product's photos in its own row. The counter shows how many of the 50 places you've used.
Continue to the photoshoot settings
When every product has its main photo, click Continue to photoshoot. The Batch overview panel shows how many products are ready. New photos upload at this point, and uploading uses no credits.
Set one look for the collection
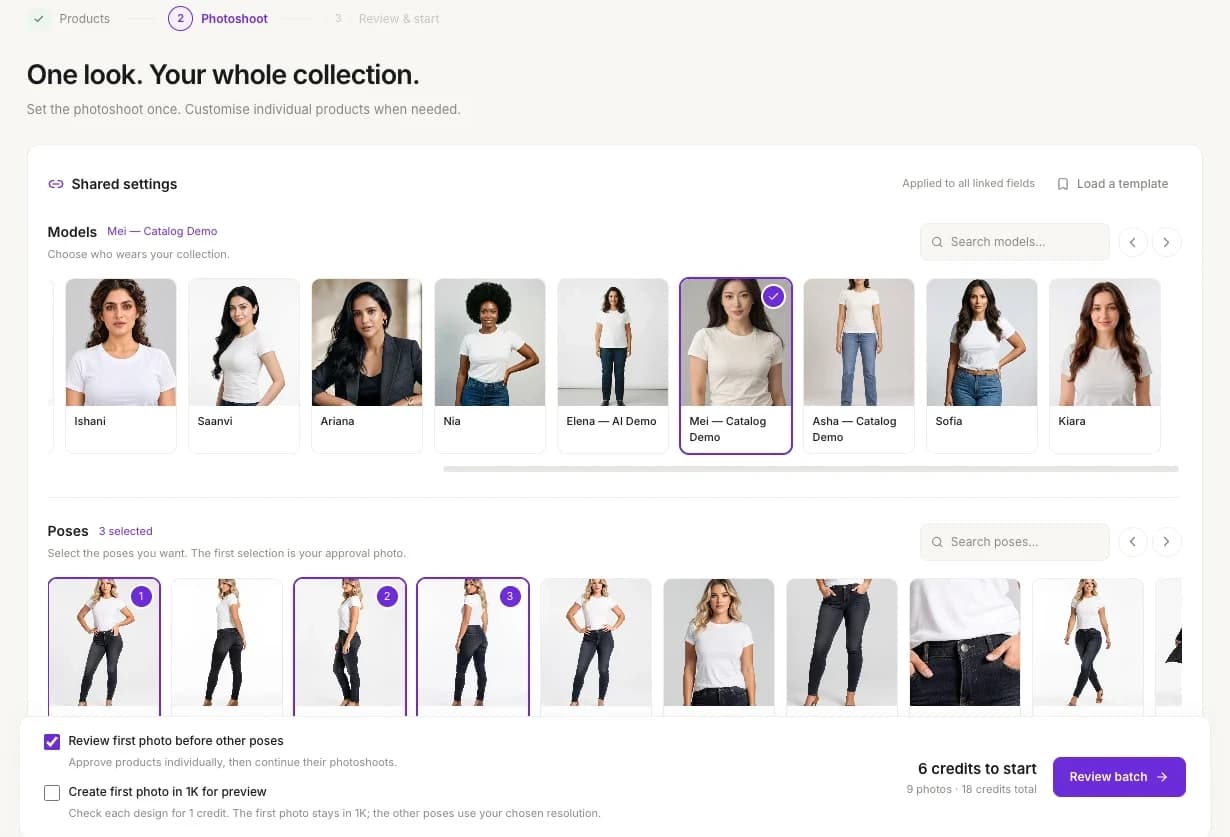
In Photoshoot, choose one model, your poses and a background under Shared settings. They apply to every product. To start from a saved look, click Load a template.
Choose the output settings
Pick the Aspect ratio and Resolution, and add Additional instructions if you need them.
Customise single products (optional)
In Product settings, click Customise next to a product to give it its own model, poses, background or output settings. The other products keep the shared look.
Choose how the batch runs
Leave Review first photo before other poses on to approve each product's first photo before its other poses are made. Then click Review batch.
Review and start
In Review & start, give the batch a name, check each product's settings and the Photoshoot summary, then click Start first photos (or Start photoshoot if review is off).
Photo slots for each garment mode
The photo slots in each row depend on the garment mode you've chosen in Settings:
| Garment mode | Required photo | Optional photos |
|---|---|---|
| Standard | Front photo | Back photo |
| Dupatta | Dupatta | Back photo |
| Saree | Saree body | Pallu, Blouse |
| Salwar Kameez | Top | Bottom, Dupatta, Sleeve |
| Shirt | Shirt fabric | Logo, Collar, Cuff |
Click Upload photo in a slot or drag a photo onto it. You can use JPG, PNG, WebP or HEIC photos. Each product name can be up to 100 characters.
Add products you've already uploaded
Choose saved products opens your product library. Search for a product and click Add product. All its photos come with it. The dialog shows how many places are left in the batch. Click Done when you've finished.
One shared look for many products
| Setting | What to know |
|---|---|
| Models | Pick one model for the whole collection. |
| Poses | Pick several. They're numbered in the order you pick them, and the first one is each product's approval photo. Your own poses come first, with a Custom badge. You can have up to 10 photos per product. |
| Backgrounds | Pick one. White Seamless is selected unless you choose another. To describe your own setting, choose Describe your own (up to 2,000 characters). |
| Aspect ratio | 1:1 Square, 4:5 Social, 4:3 Standard and 3:4 Portrait (selected unless you choose another). + 6 more ratios adds 9:16 Story, 16:9 Landscape, 2:3 Tall, 3:2 Photo, 5:4 Wide and 21:9 Cinema. |
| Resolution | 1K Standard (1 credit per photo), 2K HD (2 credits, selected unless you choose another) or 4K Ultra (3 credits). |
| Additional instructions | Anything else to keep or change, up to 2,000 characters. In Shirt mode, this section also has the pocket, sleeve length, fit and collar style choices, and the Logo: chest and Logo: back tag checkboxes. |
Some aspect ratios have slightly different names here than in a single photoshoot (for example, 2:3 is Tall here and Tall Portrait there).
Load a template
Click Load a template to fill in the shared settings:
- Saved shoot template applies one of your shoot templates: its model, poses, background, aspect ratio, resolution, instructions and saree styling.
- First photo look makes photo 1 of every product use a look from the Templates gallery. The background choice is hidden, and any extra poses you pick are based on that first photo. The template photo counts toward the 10 photos per product.
Customise a product
The Product settings table lists each product with its model, poses, background and output. Each value is tagged Shared or Custom. Click Customise next to a product to change its settings, and click Done when you've finished. To return a product to the shared look, click Use all shared settings.
Review the first photo before the rest
With Review first photo before other poses on (it's on unless you turn it off), every product makes its approval photo first. You approve products one by one, and only then are their remaining poses made. If a product needs changes, you find out after one photo.
To save credits on these first photos, also tick Create first photo in 1K for preview. You then check each design for 1 credit. The first photo stays in 1K, and the other poses use the resolution you chose. This option appears when review is on and the resolution isn't 1K.
With review off, the remaining photos continue automatically after the first one.
Credits
Each photo costs credits at its resolution: 1 at 1K, 2 at 2K and 3 at 4K. The footer shows the credits to start and the total for the batch. With review on, only the first photos are charged when you start, and the rest after you approve.
For example, 6 products with 4 poses each, at 2K:
| Review on | Review on, with the 1K preview | |
|---|---|---|
| Photos | 24 | 24 |
| Credits to start | 12 | 6 |
| Total credits | 48 | 42 |
If you don't have enough credits, the page tells you how many the batch needs and how many you have, with Get credits and Refresh balance buttons. See How credits work.
After you start
The batch opens on its own page, and you can come back to it from Recent batches on the Bulk photoshoots page. If you allowed browser notifications, ApparelAI tells you when:
- your previews are ready for approval,
- the batch is paused because you need more credits ("Paused: add credits, then resume your photoshoot."),
- your bulk photoshoot is ready, or finished with some failed photos.
See Notifications.
Bulk photoshoot or a single photoshoot?
| Photoshoot | Bulk Photoshoot | |
|---|---|---|
| Products | One | Up to 50 |
| Photos | One photo with one pose | Up to 10 per product |
| Approve the first photo first | No | Yes, unless you turn review off |
| Where to start | New Photo Shoot | Bulk Photoshoot |
For a single photo, see Create a photoshoot.
Turn the catalog into video
Any photo from a bulk shoot can become a video with AI Image to Video. The Fit check, Seamless loop and Turnaround motion templates are made for product pages. See Turn a photo into a video.
Frequently asked questions
You can shoot up to 50 products in one batch, with up to 10 photos each. You choose one model, your poses and a background once, and they apply to every product.
Every pose of every product is one photo, and each photo costs 1 credit at 1K, 2 at 2K or 3 at 4K. For example, 6 products with 4 poses each at 2K make 24 photos for 48 credits, or 42 credits with the 1K preview. If a running batch runs out of credits, it pauses until you add credits and resume it.
Yes. Leave Review first photo before other poses on, and each product's other poses start only after you approve its first photo. To check each design for 1 credit, also tick Create first photo in 1K for preview.
Yes. In Product settings, click Customise next to a product to give it its own model, poses, background or output settings, and the other products keep the shared look. Use all shared settings puts a product back on the shared look.
Yes. Each product row has the photo slots of your garment mode: Saree body plus optional Pallu and Blouse in Saree Mode, or Top plus optional Bottom, Dupatta and Sleeve in Salwar Kameez Mode. Choose the mode in Settings before you start.
Related
Add your logo and text with Brand Kit
Add your logo to product photos with Brand Kit: save your brand logo once, add text in any color, drag everything into place and save it into the photo.
Garment modes
Garment modes tune AI photoshoots for sarees, dupattas, salwar kameez and shirts, with the right upload slots, poses and styling options for each garment.