
Create poses from a photo
Change the pose of a photo without a reshoot: pick up to 10 preset or custom poses, keep the same model, garment and background, and see the cost first.
Use Create Poses to change the pose of a photo you've already made. The model, the garment and the background stay the same, and only the pose changes. Pick up to 10 poses at once to turn one good shot into a matching set, such as front, back and side views for a listing.
Create Poses is on the Photo Shoot Result page, the editor where every finished photoshoot opens. These steps are for the web app.
Open ProjectsTurn one photo into new poses
Open the photo in the editor
Open the photo on the Photo Shoot Result page. A new photoshoot opens there when it's ready. For an older shoot, click Projects in the sidebar, open the project and click Edit in Studio.
Click Create Poses
Under Generate More on the right, click the highlighted Create Poses button ("Same photo, different poses").
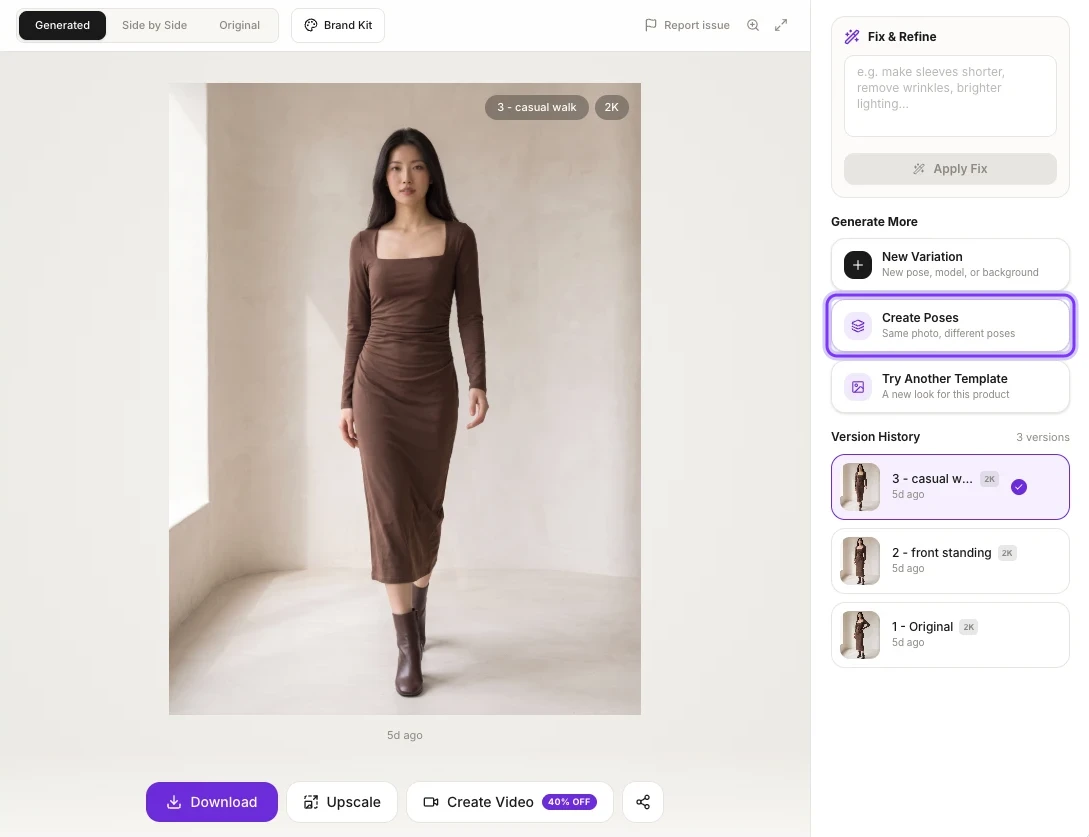
The Create Poses panel opens ("Generate new poses from current image"), with two steps: Poses and Output. Your photo is shown at the top under REFERENCE, with the note "Only the pose will change".
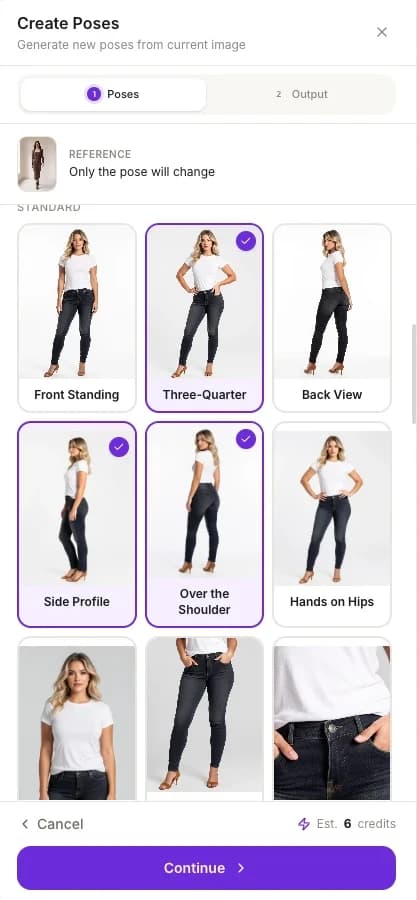
Pick the poses
Click each pose you want, up to 10. You can mix preset poses with your own saved poses. Selected poses get a check mark, and the footer shows the cost, for example Est. 6 credits for three poses at HD - 2K. Then click Continue.
Choose the output
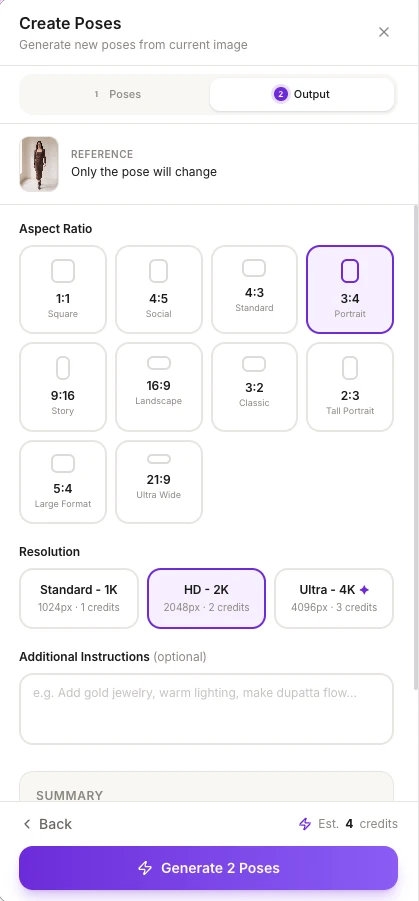
Pick an Aspect Ratio (all 10 ratios are shown) and a Resolution: Standard - 1K, HD - 2K or Ultra - 4K. Under Additional Instructions (optional), you can add details, for example "Add gold jewelry, warm lighting, make dupatta flow".
Generate the poses
Check the SUMMARY: the number of poses (for example "0 custom + 2 preset = 2"), the Aspect Ratio, the Resolution and the Total Credits. Then click the generate button. Its label shows how many poses you picked, for example Generate 2 Poses.
Which poses you can pick
The panel has the same preset poses as the Pose step of a photoshoot, grouped into categories such as Standard, Movement, Casual, Seated, Editorial and Dynamic. Poses you've saved as your own are listed too.
To build a set for a listing, try:
- Back View and Side Profile to show the back and the fit.
- Three-Quarter for a natural catalog angle.
- Close-up (Top) or Fabric Close-up for the details.
For every preset pose, and how to save your own, see Choose a pose.
Check back-view poses
A back-view pose shows the back of the garment. If your product doesn't have a back photo, the back in the new photo may not match your garment. See Back-view poses.
Credits for new poses
You pay for each pose at the resolution you choose: 1 credit at Standard - 1K, 2 at HD - 2K and 3 at Ultra - 4K.
| Poses | Standard - 1K | HD - 2K | Ultra - 4K |
|---|---|---|---|
| 1 | 1 credit | 2 credits | 3 credits |
| 2 | 2 credits | 4 credits | 6 credits |
| 5 | 5 credits | 10 credits | 15 credits |
| 10 | 10 credits | 20 credits | 30 credits |
Until you pick a pose, the footer shows Est. 0 credits and you can't continue. See How credits work.
Create Poses or New Variation?
Create Poses changes only the pose. To change the model, the background or the other settings as well, use New Variation.
Check every pose before you publish
Each pose is a new image. Compare it with your garment, especially logos, embroidery, borders and stitching, and fix anything that's off before you list it.
Frequently asked questions
Open the photo on the Photo Shoot Result page and click Create Poses under Generate More. Pick the poses you want, choose the output and click the generate button, such as Generate 2 Poses. The model, garment and background stay the same, and only the pose changes.
You can pick up to 10 poses at once. Mix preset poses with poses you've saved as your own, and each pose is a new image.
Each pose costs 1 credit at Standard - 1K, 2 at HD - 2K and 3 at Ultra - 4K, so 5 poses at HD - 2K cost 10 credits. The footer shows the total as Est. N credits before you generate.
Yes. Pick Back View, or Side Profile for the side. If your product doesn't have a back photo, the back in the new photo may not match your garment. See Back-view poses.
Not with Create Poses, which changes only the pose. To change the model, pose, background or output settings, use New Variation.
Related
Make a new variation
Make a new variation of an AI fashion photo: change the model, pose, background or aspect ratio, keep the rest, and see the credit cost before you start.
Add your logo and text with Brand Kit
Add your logo to product photos with Brand Kit: save your brand logo once, add text in any color, drag everything into place and save it into the photo.