
Create a photoshoot
Turn a flat lay or product photo into an AI model photoshoot in five steps: choose your product, model, pose, background and output, then generate your photo.
An AI model photoshoot puts one of your garments on a model, in the pose and background you choose. In the web app, you set it up on the Create Photo Shoot page in five steps: Product, Model, Pose, Background and Output. Each photoshoot makes one photo with one pose.
Open New Photo ShootIf you just want your first photo quickly, start with Your first photoshoot. To shoot many products or several poses at once, use Bulk photoshoot. To combine separate products, such as a top and a bottom, into one outfit photo, use AI Outfit Builder.
Open the photoshoot page
Click New Photo Shoot at the top of the sidebar. You can also start from:
- Photo Shoots in the sidebar.
- Create Photoshoot under Quick Actions on Home.
- A product: on the Products page, hover over a product and click Shoot, or click Generate Photo Shoot in its Product Details. The product is already selected and the page opens at the Model step.
- A model: on the Models page, hover over a model and click Use in Shoot. The model is already selected.
These steps describe the web app. The iOS and Android apps have their own layout. See Using the mobile app.
From flat lay to model photo, step by step
Product
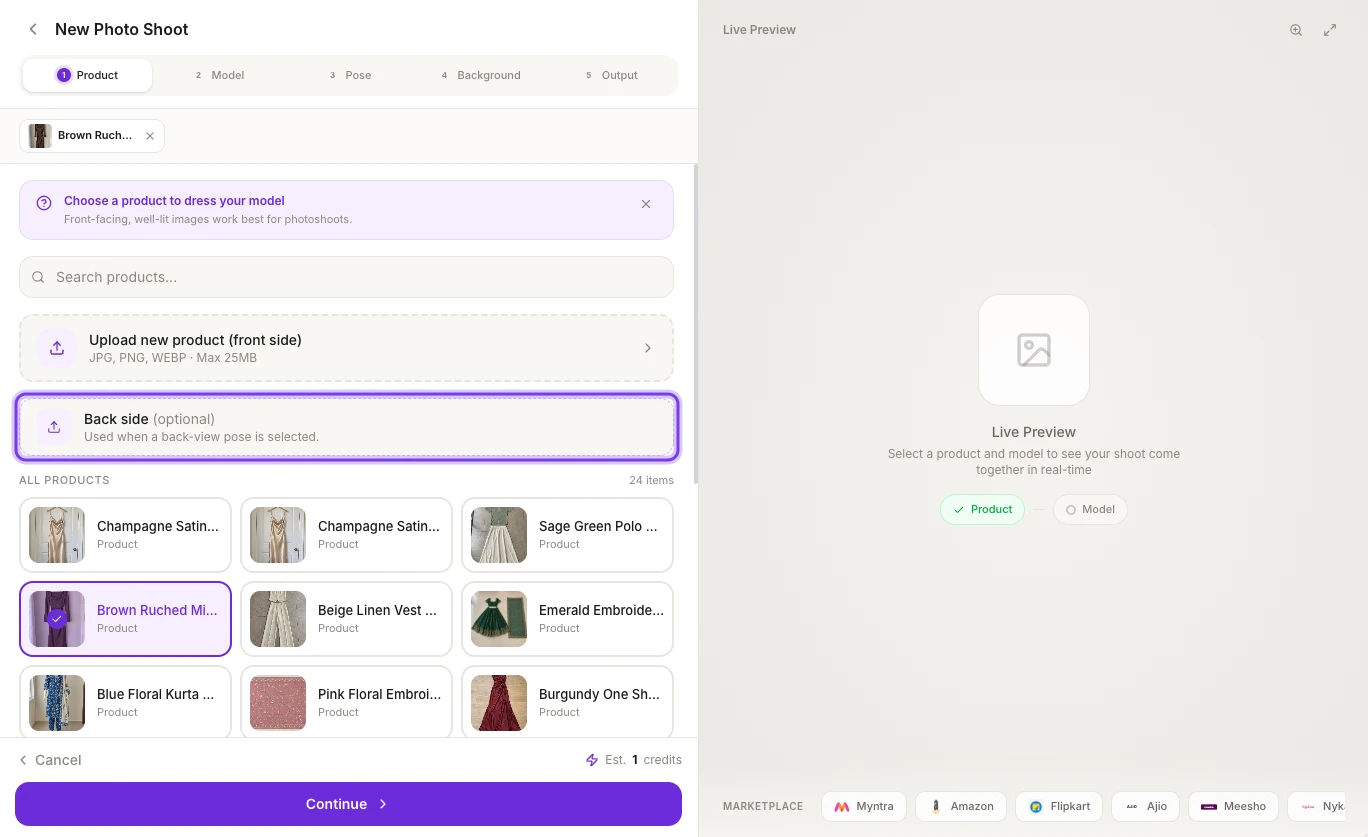
Upload a photo of your garment, or pick one from All products. In Standard mode, click the Upload new product (front side) tile and choose a photo (JPG, PNG or WEBP, up to 25 MB). It uploads when you click Continue.
To show the real back of the garment in back-view poses, also add a photo in the Back side (optional) tile. Sarees, salwar suits and shirts have their own upload slots instead (see the table below).
Model
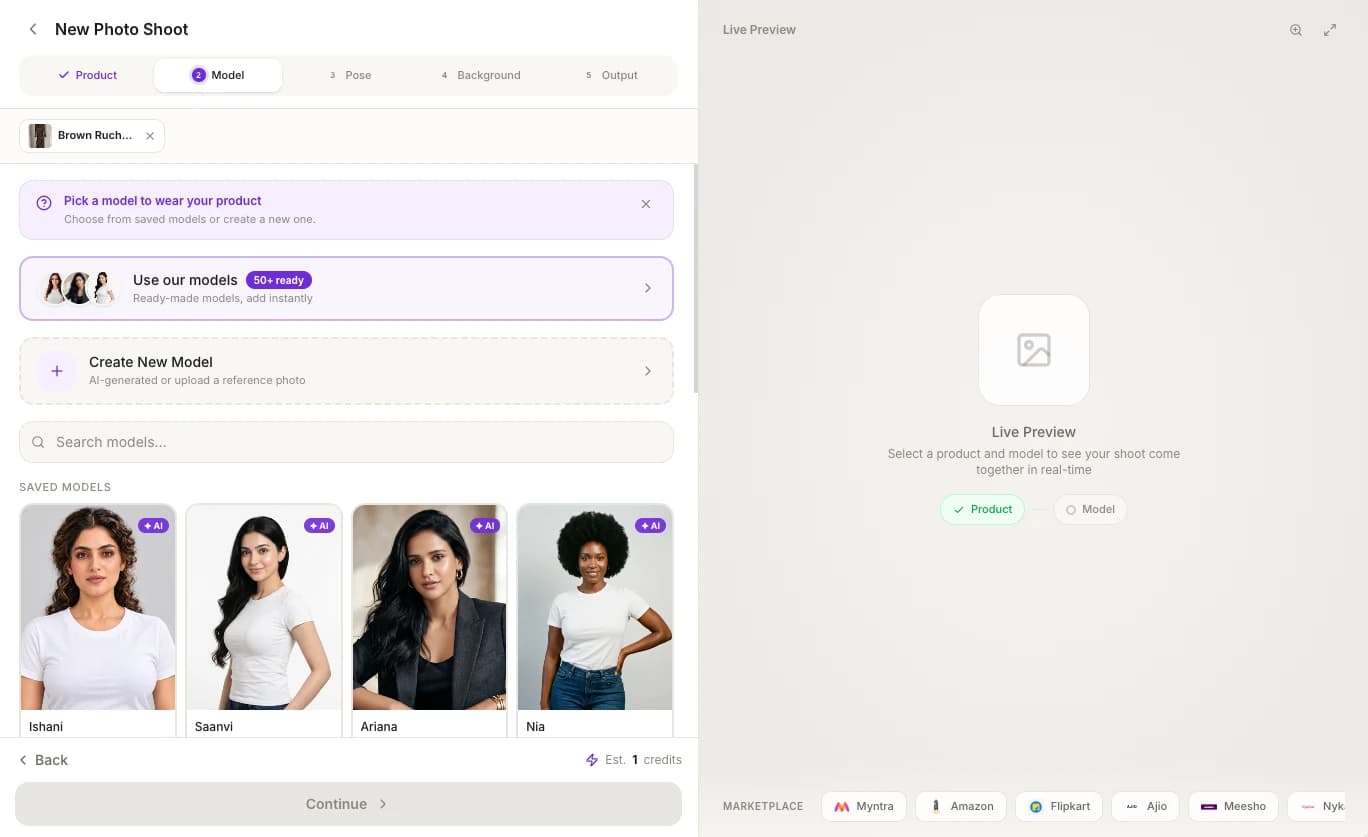
Pick a model under SAVED MODELS, click Use our models to add one from the model gallery, or click Create New Model to make your own. Clicking a saved model selects it and moves you to the Pose step. See Choose a model.
Pose
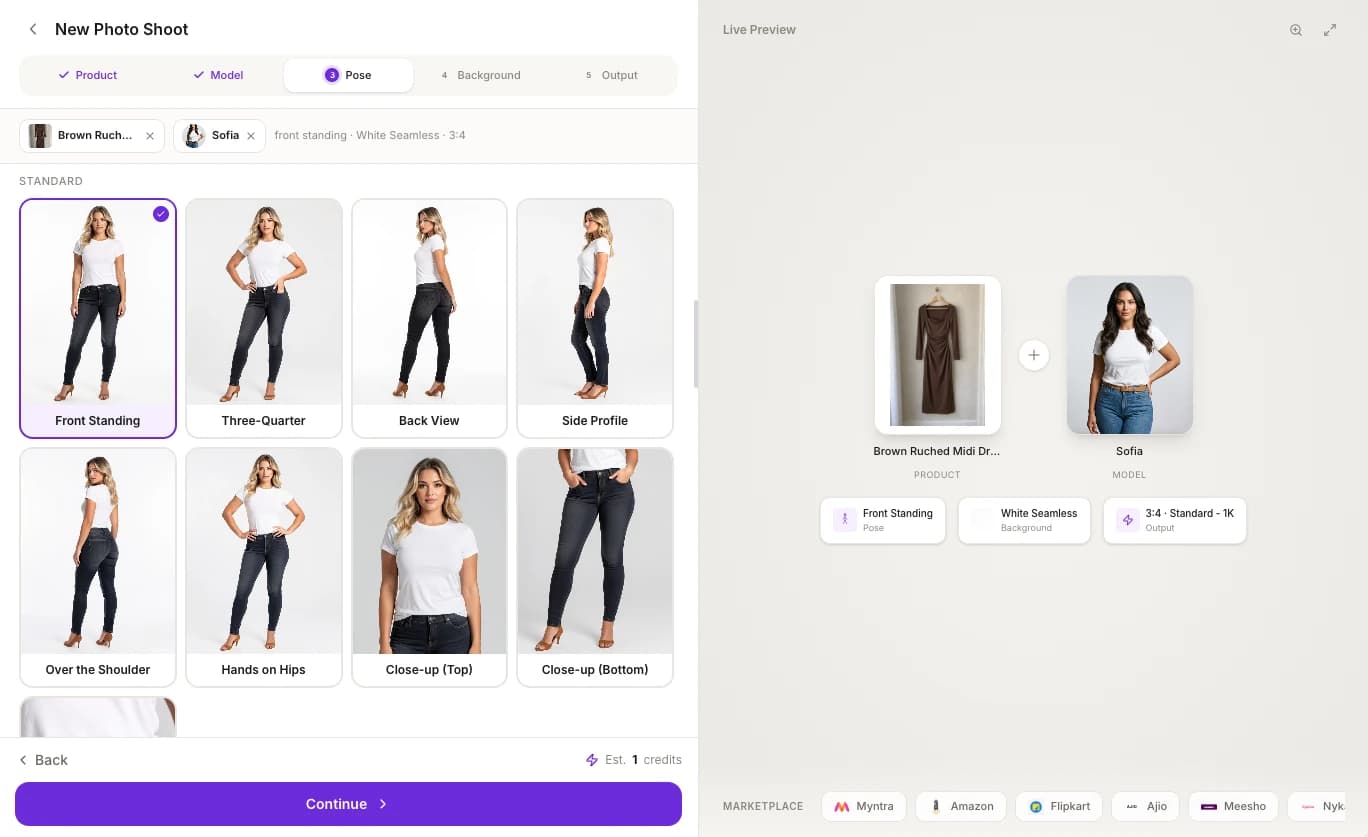
Pick one pose: a preset, one of your own poses under YOUR POSES, or a pose you describe in words. See Choose a pose.
Background
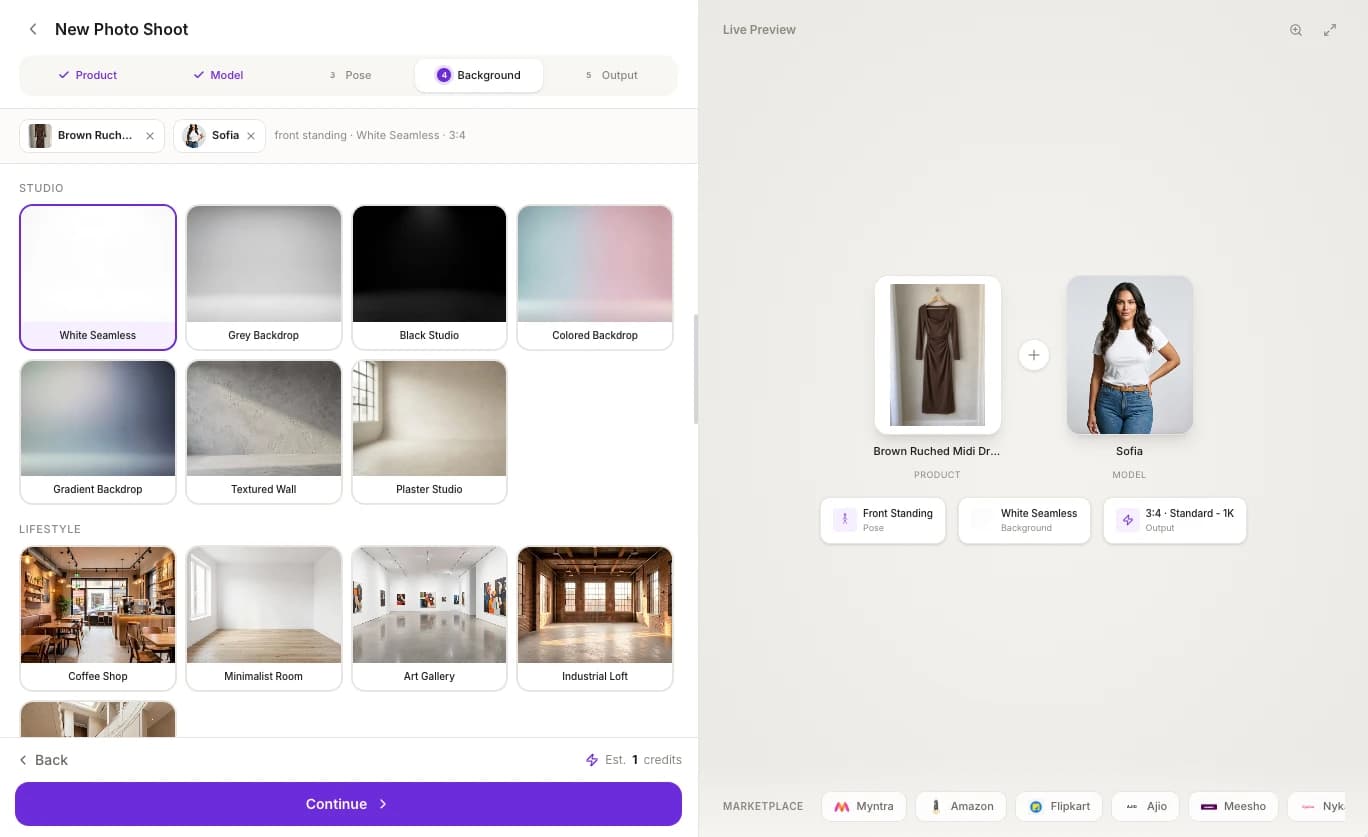
Pick one background: a preset, one of your own backgrounds under YOUR BACKGROUNDS, or a background you describe. See Choose a background.
Output
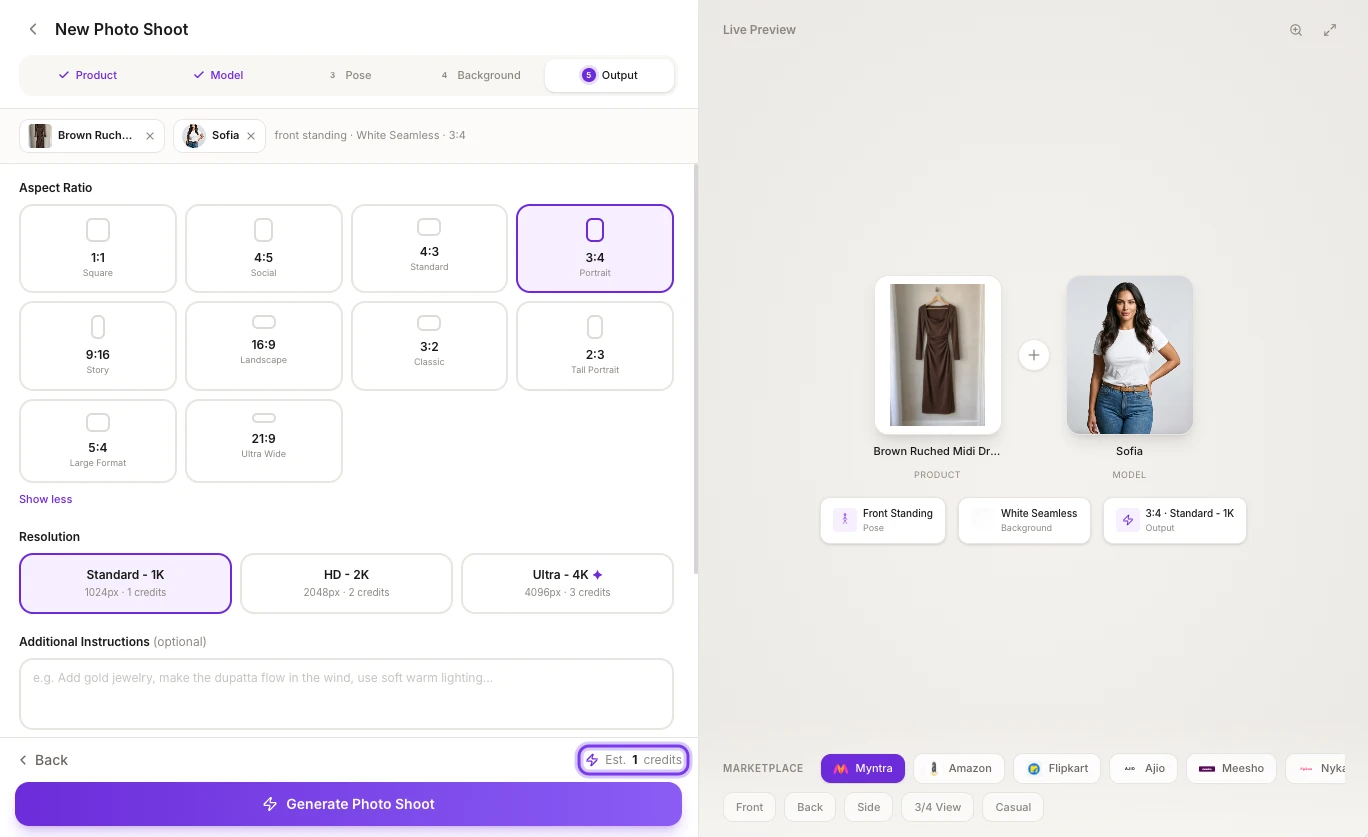
Choose the Aspect Ratio and Resolution, add Additional Instructions if you want, and check the Shoot Summary. See Output settings.
Generate
Click Generate Photo Shoot. The footer shows the cost before you click, for example Est. 2 credits.
Find your way around the page
- Step tabs. The tabs at the top (Product, Model, Pose, Background, Output) get a tick when they're done. Click a tab to go back to that step.
- Your choices. After you pick a product and a model, they appear as chips under the tabs, followed by a short summary of your pose, background and aspect ratio. Click a chip to jump to that step, or click its × to clear it.
- Hints. Each step starts with a short tip box. You can close it.
- Footer. Continue moves to the next step once the current one is complete. Back returns to the previous step, and Cancel on the first step takes you back to Home.
- Live Preview. On a computer, the Live Preview panel on the right shows your product and model side by side, with cards for your Pose, Background and Output choices.
- Marketplace presets. Under the Live Preview, the MARKETPLACE bar sets the pose, background, aspect ratio and resolution for Myntra, Amazon, Flipkart, Ajio, Meesho or Nykaa Fashion in one click. See Use marketplace presets.
Upload slots for each garment mode
The Product step changes with the garment mode you've chosen in Settings. Sarees, salwar suits and shirts get a slot for each part of the garment:
| Garment mode | Upload slots | Button |
|---|---|---|
| Standard and Dupatta | Upload new product (front side) and Back side (optional) | Continue |
| Saree | Saree Body (required), Blouse, Pallu | Upload Saree & Continue |
| Salwar Kameez | Top (Kameez) (required), Bottom, Dupatta, Sleeve | Upload Salwar Kameez & Continue |
| Shirt | Shirt Fabric (required), Logo, Collar, Cuff | Upload Shirt & Continue |
In every mode, you can skip the upload and pick a product you've already added. See Garment modes to switch modes.
For tips on taking a photo that gives accurate results, see Prepare your garment photos. Every garment you upload is kept in your product library, so you can shoot it again later.
Reuse your favorite setup
If you've saved shoot templates, a Shoot templates row appears at the top of the Product step. Click one to fill in its model, pose, background and output settings. See Reuse settings with shoot templates.
Credits
Each photo uses credits by resolution: 1 credit at 1K, 2 at 2K and 3 at 4K. The estimate in the footer updates as you change the resolution. See How credits work.
If you don't have enough credits, the page shows how many you need and how many you have, with an Upgrade plan link, and the button changes to Not Enough Credits.
While your photo generates
The button shows the progress, from Creating project... to Photo shoot ready! Opening results..., and the Live Preview shows what's happening. The app says this usually takes 30 to 50 seconds. When it's done, your photo opens on the Photo Shoot Result page.
ApparelAI may ask whether you want to be told when it's done (Get notified when it's ready). Click Allow, and if you switch to another tab while you wait, you'll get a browser notification when your photoshoot is ready. See Notifications.
After you generate
Every photoshoot is saved as a project, listed under Projects in the sidebar and in Recent Projects on Home. See Projects and history.
From there you can edit the result, download it or turn it into a video:
Check the details before you publish
AI results can vary in color, weave, fit, drape and small details. Compare each photo with your actual product, especially logos, embroidery, borders and stitching, and fix anything that's off before you list it.
Other ways to start
- Photoshoot templates: start from a ready-made look in the Templates gallery.
- Bulk photoshoot: shoot up to 50 products in one batch, with up to 10 photos each.
Frequently asked questions
Click New Photo Shoot and upload a photo of your garment, such as a flat lay or a hanger shot, in the Product step. Then pick a Model, Pose and Background, set the Output, and click Generate Photo Shoot. The photo is usually ready in 30 to 50 seconds and opens on the Photo Shoot Result page.
Upload a clear, front-facing photo that shows the whole garment, such as a flat lay, a hanger shot or a mannequin photo. The Product step takes JPG, PNG or WEBP files of up to 25 MB. See Prepare your garment photos.
Yes. In the Model step, pick one of your SAVED MODELS, add a ready-made model with Use our models, or click Create New Model to design an AI model or use a photo of a real model, with their written consent. Every model you add is saved, so you can use the same one across your whole catalog. See Choose a model.
Each photo costs 1 credit at Standard - 1K, 2 at HD - 2K and 3 at Ultra - 4K. The footer shows the total, such as Est. 2 credits, before you click Generate Photo Shoot. See How credits work.
Not in one photoshoot: each one makes one photo with one pose. For the same photo in more poses, use Create Poses on the Photo Shoot Result page. To shoot up to 50 products, with up to 10 photos each, use Bulk Photoshoot.
Related
Prepare your garment photos
Get accurate AI photoshoot results: which garment photos work best, when to add a back photo, file types, and the separate parts for sarees, suits and shirts.
Choose a model
Pick a ready-made AI fashion model from the gallery, create a custom AI model for your brand, or upload photos of a real model to reuse across every shoot.